 |
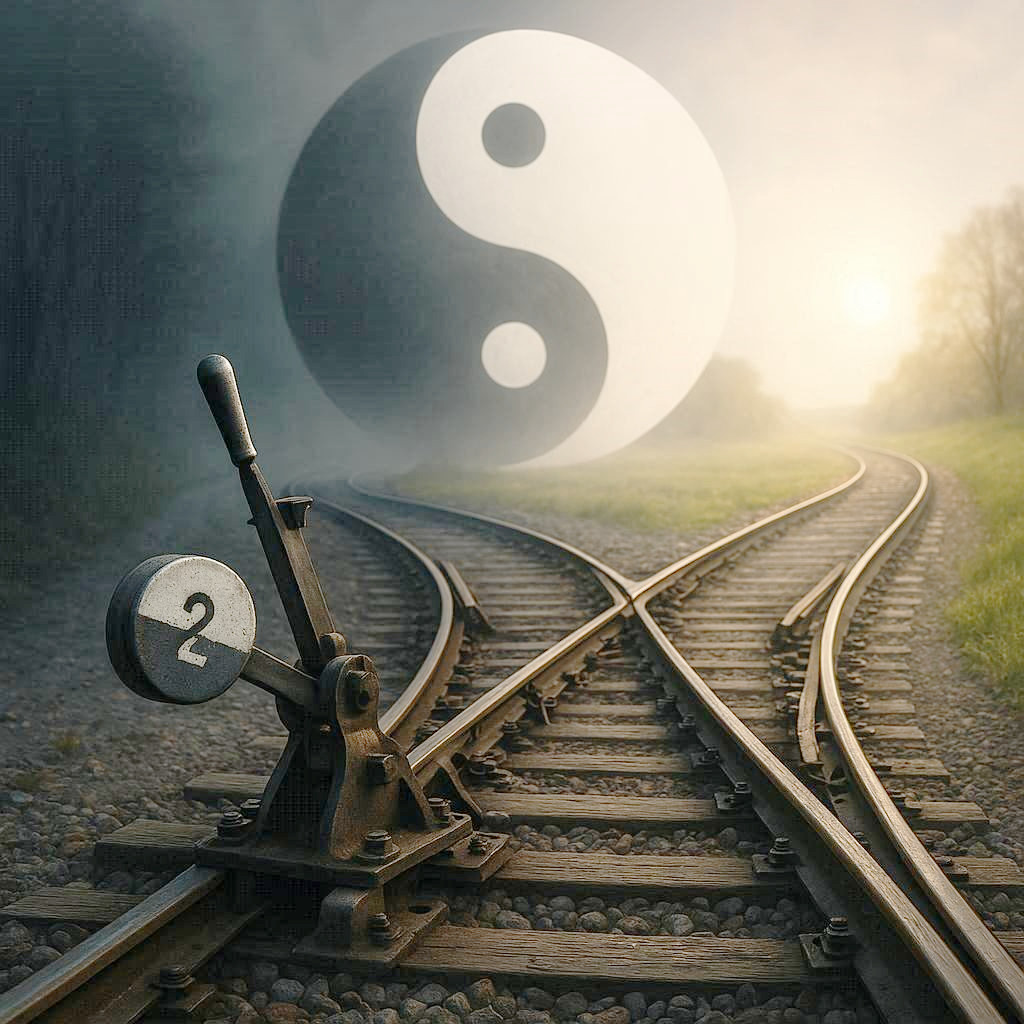
Master Chen’s teachings on Taiji center on the sophisticated use of pivots and levers within the body, a concept he refers to as “switching” rather than moving. The core principle is akin to a train operator skillfully changing tracks to redirect a train’s power and speed without altering its own engine. Instead of a gross shift in the body’s center of gravity, which Master Chen views as inefficient, the practitioner learns to utilize three vertical lines—one central and two on either side of the torso—as internal fulcrums for a human lever. |
| This allows them to switch the pivot point to gain a mechanical advantage, either prioritizing speed and range (like placing a lever’s pivot closer to the force) or power and stability (by moving the pivot closer to the load). By mastering this internal leveraging system, one can maintain a stable, unmoving core while seamlessly applying force and changing direction, much like a train maintaining its steady momentum while being redirected by the track switch to a new destination. | |
| (This is an edited transcript of a mini lesson Switching in the Positive Circle filmed in 2014, Berlin, Germany.) |
|
|
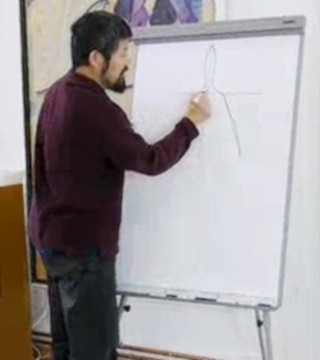
Master Chen draws a schematic of the upper torso on a whiteboard. He identifies a point on the centerline of the body and begins: “This here [point on the centerline] is important, but when we practice, this place is changed.”
This schematic is reproduced in Figure 01. Pointing to the green dot on the centerline, he states, “This one is called the central equilibrium. It is the guide [but] it’s not functional. |
|
To use it, this [point] is moved to here [left side, close to the left shoulder], sometimes here [right side, close to the right shoulder]. So altogether the body has three lines: one [the central equilibrium], two [on the left shoulder], and three [on the right shoulder].”
Those demarcation lines are shown as green dashed lines extending vertically down to the floor in Figure 01. Master Chen explains the main point of these lines: “ Taiji is based on switching your pivot.” |
 |
 |
Master Chen holds a long black cylinder to illustrate the idea of a pivot. He introduces the first scenario, which begins with the cylinder balanced on his finger in the middle position. He demonstrates this balanced position by moving the ends up and down, pivoting on the central point. This position is shown in Figure 02A. He describes the situation: “This [balanced position] is normal [position.] This is 50-50 balanced.” What Master Chen is describing is a first class pivot. At one end of the lever is the applied force, also known as the input or effort. This is the force you generate to initiate movement. At the opposite end is the resistance, often referred to as the load or output. This is the force that must be overcome for the lever to function effectively. |
He then applies this model to Taiji applications: “When you fight, sometimes you want speed, so you put it [the pivot] here [closer to the applied force]. [The result is that the other end of the lever that is further away from the pivot can cover more distance and appears faster.]” This represents the second scenario, with this pivot placement shown in Figure 02B. Master Chen describes the movement of this end: “Oh [high] speed, very fast and long reach but it’s not efficient, very hard [you need more effort to overcome the resistance].”
He then introduces the third scenario, where the pivot point is positioned far away from the applied force and closer to the load. This position is shown in Figure 02C. Master Chen suggests, “Then sometimes you need this [where the pivot point is away from the applied force.].” In this case, less effort is required, but the process takes more time—it’s slower overall.
Finally, he concludes: “So here [in this model situation] you learn three [points]. In the end [in real applications], it [the pivoting point] can be anywhere. [The concept of] ‘not moving’ means establishing this [idea of changing the location of the pivot along the lever.]”
|
Master Chen applies the idea of the lever, which describes actions in a vertical direction, to movements that involve rotations. He instructs two students to each hold a marker to denote a reference point, while he himself represents the centerline. Master Chen directs: “You hold one [marker] Can you hold [the other one.]” This initial setup is shown in Figure 03A.
He explains: “This one [set up.] Normally, this whole thing [the three reference points] is rotating like this. [All three segments denoted by the reference points are moving together, pivoting on a centerpoint.]” |
 |
Presenting the model explanation, he continues: “but sometimes … I go rotate here.” Master Chen holds two segments stationary and rotates one segment along one reference point. He then offers another alternative: “Sometimes I go rotate here.” This time, he holds all three segments and rotates them around the last reference point.
He concludes: “ The vertical line is [the axis] for a horizontal rotation . okay. Now you understand? The rotation has to be pivoted. So there are three of them [axis for rotation]. ” This conclusion is illustrated in Figure 03B, which shows an overhead view of the three axes and the differences in their radius of rotation.
 |
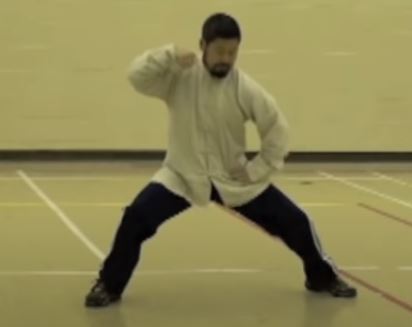
Referring back to the initial schematic (Figure 01) as a reference point, Master Chen stands in the ready position for the Positive Circle and demonstrates how the points on the model figure relate to the action of the Positive Circle. “Now these three [dots on the diagram] are seen in this stance as vertical axis on my front shoulder, through the centerline, and on my rear shoulder.” This ready stance is shown in Figure 04A, with the centerline highlighted as a green dashed line. |
Master Chen explains: “When you are doing the first half of the Positive Circle [with the two actions of ‘In with elbow’ and ‘Turn with waist’], it [the focus of the action] is here [the front vertical line that connects the front shoulder through the front kua and onto the floor]. It’s not here [in the central line] anymore. It’s here [on the front vertical line]. It gives you a little bit of advantage. It means when the pivot is here [on the front line], this is longer [in the back] than here [in the front], and because of that you are strong [with the action of ‘In with Elbow’].” This stance is shown in Figure 04B, with the front vertical line highlighted by a green dashed line.
He continues: “[In the third movement, ‘Out with Hand’] on the push here, if your opponent is [providing strong resistance], you feel this [push] does not work [when the pivot is on the front line]. You switch it [the pivot] to here [rear vertical line that connects the rear shoulder to the rear kua through to the floor]. The movement is here [based on the pivot on the rear vertical line].” This action is shown in Figure 04C, with the rear vertical line highlighted by a green dashed line.
|
Master Chen emphasizes: “So all we do on this [Positive Circle training] here is switching. [There is] no movement . This is a very, very important [concept to master.].”
He cautions: “At the beginning, it takes a long time for us to change the body so that we can fight with Taiji abilities. Do not learn to fight too early because your body does not know how to do it.” Master Chen explains how movement is achieved with a static structure. “So in order to move here [your dantian or center of mass], you must keep this shape [the initial structure of the Position Circle with no change in the feet and head relationship]. [Yet,] you are too far from your opponent.” This initial structure is shown in Figure 05A. He then demonstrates the proper Taiji stepping method to change the location of the center of mass without altering the final structure. “You go like this,” he begins, reaching forward with his heel and widening his stance. This intermediate action is shown in Figure 05B. He repeats this stepping process to explain the idea of covering large distances, cautioning: “All movements must come from the foot. [Movement must] never [come] from here [leaning forward with your head]. [Movement must] never [come] from here [reaching forward with your hands].” The final action is shown in Figure 05C. Master Chen reminds his students of a basic Taiji principle: “ This [principle] must always ‘be the top never move’. So all movements must be like this [initiated by the foot].” |
 |
He proceeds to demonstrate a series of stepping movements, always maintaining the initial and final structure, but showing their quickness and flexibility by covering different angles and distances. He emphasizes: “This [proper movement in the Practical Method] you can never do anything like that [lean forward or shift your center of gravity as you will normally do].”
Finally, he adds: “You always can [perform normal actions] but it’s wrong. It’s not good for you. You’ll fall down. So at the very beginning, you must be aware of these three things [the three vertical axis on the human body]. So switching. No movement.”
Master Chen reviews the concepts again, ensuring that the students understand that when practicing the Positive Circle, there is no movement or overt shifting of weight from one leg to another; rather, one should use the idea of switching.
Once again, he performs the first half of the Positive Circle as an illustration. Starting with the action ‘In with Elbow’, he explains: “Just here [front kua] no move. You choose here [this front vertical line]. Can you see, just choose here [and pull the elbow into this vertical line]. [In the third move, ‘Out with Hand’], on the way back you choose here [the rear kua]. So this [illustrates the concept of] ‘no movement’. You choose which place to use; this is called ‘switching’. Do you understand? Any questions?”
 |
Master Chen reproduces a sequence of movements drawn from another Taiji style, as illustrated in Figure 06. He compares these movements with the principles outlined in the Practical Method.
“In all other Taiji styles, they don’t switch. They move here [They shift their centerline towards the rear leg]. They move to here [back to the origin centerline. Then they] move to here [shift the centerline towards the front foot].” Figure 06 visually represents this comparison: the green dashed line indicates the initial centerline, while the red line shows how the centerline shifts with each movement. Master Chen then performs a series of correct Practical Method steps, illustrated in Figure 07. He explains: “Ours [Practical Method, action is] just here [in the kua.] [If] you want this one here [reach a position that is outside your structure.] Can you see [I reach forward with my front heel and widen my stance without moving my centerline.] Now it’s here [I have reached a distance outside my initial stance]. [Then I bring my centerline forward after planting my front foot.] It [original structure] is here.” Figure 07 uses a solid green line to indicate how distance is being covered. |
 |
 |
| Master Chen continues: “[You can repeat this process if] you want to go here, [or] here.” Figure 08 presents a sequence of Taiji steps, demonstrating how distance and angles shift through stepping. In this figure, Master Chen places one hand on his head and the other on his dantian to show his students that the centerline remains stable throughout the movement. |
This Taiji stepping can be contrast to ordinary human walking. During walking, the body’s center of gravity shifts in a smooth, rhythmic pattern to maintain balance and forward momentum. With each step, it moves side-to-side toward the supporting leg, rises slightly during mid-stance, and lowers when both feet are in contact with the ground. This creates a gentle forward glide that promotes efficient energy use and stable movement.
 |
In Practical Method training, this dynamic motion is gradually reduced and ultimately eliminated, replaced by a continuous and steady movement that does not fluctuate.
Master Chen reminds his students: “When you go, don’t go [starting with moving your center of gravity or lean forward with your head] and don’t go like this [initiate the stepping by lifting your front foot.] [Proper Practical Method training means] no movement [but change the pivot.]” Figure 09 illustrates incorrect Taiji movements, highlighting common mistakes such as leaning and improper stepping. Figure 09A shows the error of leaning during movement, while Figure 09B depicts the mistake of stepping with vertical displacement. Both errors must be eliminated for correct practice. |
To emphasize the importance of foundational principles, Master Chen uses the analogy of constructing a house. He explains: “So these are the basics at the beginning. If you don’t get these right, many, many problems later on or more problems. Can’t build a house — the bottom is not a real brick—and then you can’t change it anymore, it’s too heavy. So for the same reason, at the very beginning, we must understand these three [pivots] here [on the body.]”
 |
Master Chen provides further clarification on the three pivots by explaining: “So when you have the three [section]. Eventually, [you will discover that] each one [section] is the size of here [distance between the knee and the ankle – the length of the tibia].”
Standing in the ready posture, Master Chen describes the width of the stance. He continues: “Now you see this here [the width of the torso is the length of the tibia]. [Similar,] can you see the distance from here [front foot] to here [front kua] is the same as this [width of the torso] and it’s the same as this one [rear kua to the rear foot.]” Figure 10 illustrates the stance width, showing the three sections and their proportional alignment. |
|
Master Chen explains: “So now you got three of them [sections and lengths to work with.]” Using the same movements from the Positive Circle shown in Figure 04, he continues: “So I can use here [the front kua] for center [the pivot. This is seen in the first and second move of ‘In with Elbow’ and ‘Out with Hand’]. I can use here [the centerline] for center [pivot]. [This centerline is actually a] fake one – never really use it. I can use here [the rear kua as a pivot.]”
Expanding on the concept, Master Chen demonstrates how this principle applies to other movements: “I can pull you. Can you see. I pulled you like this [with the transfer of pivot from the front kua to the rear kua]. [As a result,] This [front section] is very long.” His posture is shown in Figure 11A, where the movement utilizes two of the three sections of the stance. He emphasizes: “but I never move.” He then performs a movement that shifts the center of mass, which is considered an error. This mistake is illustrated in Figure 11B, with a red line highlighting the deviation caused by the change in centerline and the leaning of the head. Master Chen continues: “When I push you use here [with my front hand.] This [rear section] is very long.” This posture is shown in Figure 11C, where the movement now engages the rear two sections of the stance. He reinforces: “Can you see no move.” Master Chen concludes: “This is very very difficult. Technically it’s very easy to understand but it’s difficult [to execute] because we humans do not have that habit. So we have to learn to change our habit.” Master Chen demonstrates a training exercise designed to clearly show how switching can be understood. He begins by describing the process: “We do that.” The exercise starts with the second movement in the Positive Circle, where the elbow is tucked into the body—a posture shown in Figure 12A. He points to the front kua: “In here [front kua]. Now without moving. Go like this.” |
 |
 |
Master Chen turns his rear foot forty-five degrees, which opens the rear kua. This posture is shown in Figure 12B. He completes the action by turning the front heel outward, effectively straightening the front leg. He points out: “Can you see this is longer here [in the front.] Can you see the switching [from the front kua and the rear kua].”
This final posture is also shown in Figure 12C. These three distinct movements teach the practitioner that the action in the front can be switched to the rear without disturbing the centerline. Master Chen explains the difference between movement in the Practical Method and ordinary movement using a typing analogy. He suggests, “This method [of movement in the Practical Method] is the same as [a professional typing on] the keyboard.” He demonstrates by mimicking the rapid finger motions of a skilled typist using the technique of “touch typing.” He states, “You only are like this [moving the fingers without moving the hands].” He contrasts this smooth, efficient technique with the approach of a beginner, who typically types using the “hunt-and-peck” method—visually searching for each key and pressing it with one or two fingers. Master Chen points out, “You don’t go like this. [Search for the letter A and then type it. Then search for the next letter and so on.]” He then demonstrates the “hunt-and-peck” method to highlight its inefficiency. |
 |
Applying this analogy to movement within the Taiji form, Master Chen emphasizes that when performed correctly, the initial structure—like the hands of a ‘touch’ typist—remains stable. He describes the form by saying, “See like this,” while standing in a ready stance. “Let this [the front kua] work,” he says, stretching the front kua. He continues, “Let this [rear kua] work. Let this [front shoulder] work.”
In contrast to normal movement, which resembles the “hunt-and-peck” method, Master Chen performs a series of discrete shifts. These movements are illustrated in Figure 13, where a distinct change in the centerline is visible. The analogy highlights that the “hunt-and-peck” method is slow, fragmented, and marked by frequent pauses. On the other hand, “touch typing” relies on muscle memory and independent finger movements, resulting in continuous motion with minimal effort—making it far more efficient.
 |
Master Chen concludes by revisiting the principle of maintaining structural integrity. He begins with the initial ready stance, as shown in Figure 14A, and points out, “This. [Front kua is the pivot.]” He continues, “[If this position is] not strong enough. Can you see here. [I have engaged the rear kua. This makes the posture] longer.” This adjusted stance is illustrated in Figure 14B. |
To further extend the posture, Master Chen activates the rear foot by pivoting on it. He explains, “Can you see [the posture is] longer and now look longer [still.]” This final posture is depicted in Figure 14C.
The increase in posture length, he emphasizes, is achieved through the engagement of the joints rather than by moving the body itself.
δῶς μοι πᾶ στῶ καὶ τὰν γᾶν κινάσω
 |
This timeless declaration, attributed to Archimedes and quoted by Pappus of Alexandria in Synagoge, Book VIII (circa AD 340), captures the essence of leverage—how a small force, properly applied, can yield immense power. While Western science often presents the lever as a mechanical model, Chinese culture tends to express the same principle through metaphor and idiom. |
One such phrase, commonly invoked in military strategy, investment, and negotiation, is “以小博大” (“Use the small to win the big”), which conveys the idea of achieving outsized results through minimal input. In Taiji practice, the saying “四两拨千斤” (“Move a thousand pounds with four ounces”) illustrates the same concept in motion: using subtle, precise force to neutralize a much greater one. These expressions reflect the intuitive grasp of leverage across cultures. To truly understand this principle, we must now turn to the physics of the lever—its structure, mechanics, and implications.
Understanding the First-Class Lever
A first-class lever features its fulcrum—the pivot point—positioned between the input force (effort; applied force) and the output force (load; resistance). In a first-class lever, the effort and load move in opposite directions. The components of a lever system are illustrated in Figure 15A. The lever arm is a rigid structure that connects the effort to the load. The distance from the fulcrum to the point where the effort is applied is known as the effort arm, while the distance from the fulcrum to the point of resistance is called the load arm. This configuration enables a direct trade-off between speed and force, exemplifying the principle of mechanical advantage (MA).
How Levers Work: The Trade-Off Between Speed and Force
 |
The mechanical advantage (MA) of a lever is the ratio of the output force to the input force. It can also be calculated by dividing the length of the effort arm (the distance from the fulcrum to the input force) by the length of the load arm (the distance from the fulcrum to the output force). This relationship is defined by the law of the lever:
|
|
MA = 1 (Balanced Lever)
MA > 1 (Force Advantage)
MA < 1 (Speed Advantage)
|
Key Components of a First-Class Lever Model (杠杆)
| Component | Description |
|---|---|
| Fulcrum (支点) | The pivot point around which the lever rotates. It’s placed between the effort and the load. |
| Effort (Applied Force; 力) | The force you apply to move the lever. This is usually on one end of the lever arm. |
| Load (Resistance; 重物) | The object or force you’re trying to move or lift. It’s on the opposite side of the effort. |
| Lever Arm (杠杆臂) | The rigid bar or beam that connects the effort and the load. Can be made of wood, metal, etc. |
| Effort Arm | The distance from the fulcrum to the point where effort is applied. |
| Load Arm | The distance from the fulcrum to the point where the load is located. |
| Support Base | Optional, but useful in a model to stabilize the fulcrum and keep the lever balanced. |
| Mechanical advantage (机械优势) | Ratio of output to input force. |
First-Class Levers and Rotation: A Comparative Analysis
|
Linear Speed = Angular Velocity × Radius
|
Similarities: The Link Between Distance, Speed, and Force
 |
Figure 16 presents a color-coded hybrid diagram that visually compares the forces and components of a first-class lever with those of a rotating wheel.
In this diagram, the fulcrum is placed at the center of a rotating circle—representing the axle. The lever arms are shown as the radii of the circle, with effort applied downward on one side and the load rising on the opposite side.
|
 Red
Red Green
Green Blue
Blue Orange
 Black
BlackThis setup mirrors the action of a first-class lever, but extended into continuous motion: the wheel’s rotation becomes a seamless version of the lever’s back-and-forth movement. The visualization brings the concept to life, showing how a wheel and axle can be understood as a first-class lever rotated a full 360°, with the axle serving as the fulcrum.
|
| Both the lever and the wheel rely on geometric principles to exchange force for distance and enhance power transmission. Yet, this elegant analogy demands caution: it begins to unravel under real-world conditions. Continuous rotation introduces complexities such as the need for centripetal support, the influence of moment of inertia, and bearing friction—all absent in a simple lever. Unlike a lever, a wheel cannot reverse direction instantaneously. Moreover, factors like flexible beams, shifting angles, and dynamic accelerations disrupt the clean speed-power relationship that makes these systems appear so fundamentally alike. |
 |