 |
Master Chen continues:”This approach is fundamentally different and deeply rooted in tradition, reflecting the original way it was practiced. The absence of freedom means one cannot perform random movements, such as casually waving their hands. The concept of ‘relaxation’ that many refer to is something I personally do not understand; it does not exist within this system .” |
| (This is Part Two of an edited transcript of the Basic Principles of the Positive Circle in the 2013 Workshop in Sacramento sponsored by Carmen Farrugia.) |
|
|
Part 2. Relaxation does not exist
|
Part 1. Every motion must follow a prescribed pattern
Part 2. Relaxation does not exist
6. Relax? Don’t do it
| Master Chen begins: “In Taiji, [a term] frequently discussed is looseness [in Chinese, the term is song (鬆)]. Some interpret this as relaxation, equating being relaxed with being loose. However, looseness is not synonymous with floppiness, like a limp noodle. [In the Practical Method,] looseness refers to the stretching of ligaments to create space. For example, [Stand in a stance of the proper width.] If the ligaments are too tight, it becomes impossible to lower yourself—there simply isn’t enough room. Looseness is not about being limp or slack.” |
 |
Figure 8 illustrates an exaggerated analogy for looseness, depicting the movements of an air dancer waving in the wind. This image helps convey the visual idea of looseness but should not be confused with the true meaning within Taiji practice. It emphasizes the expansive, space-creating quality of looseness rather than uncontrolled flaccidity.
 |
Figure 9 depicts Master Chen shaking his hands, with red wavy lines emphasizing the misinterpretation of looseness as floppiness. To further illustrate this concept, he shakes his upper body, allowing his arms to flop—again marked by red wavy lines to highlight the incorrect notion of looseness.
He continued. “Looseness means having room for movement. Without it, there is no space. |
However, the body must always remain tight. Even when stretching, it must retain its structure. In Taiji, tightness is not stiffness—it is the ability to hold itself together. The body must be integral. Integrity is crucial. Looseness serves to expand or contract [the overall structure], but it must never compromise integrity. In the Practical Method, we do not permit certain movements.”
Master Chen demonstrates an incorrect technique by dropping his wrists and arms. “Can you see my arm? [It has dropped and therefore lost its integrity.] This movement is not allowed.” He repeats the incorrect move, explaining, “[When a move loses its integrity,] it is called sagging.
|
[From the Practical Method perspective, sagging] is not true looseness. Looseness is strong—it means [the body part] maintains structure while remaining mobile.”
Master Chen demonstrates the proper movement, emphasizing how the hands and arms maintain structural integrity while remaining adaptable. He likens this principle to nature, as depicted in Figure 10: “Look at the trees. Looseness enables the branches to extend gracefully when the wind passes through. [The branches stretch in response.] [In contrast,] weak branches droop or wither under the same wind. That is not true looseness.” |
 |
He concludes by reinforcing this distinction: “From the very beginning, this principle is fundamental in the Practical Method. [Knowing how to stand and what is loose] defines readiness.”
7. Position of the front hand – a seven inch knife
 |
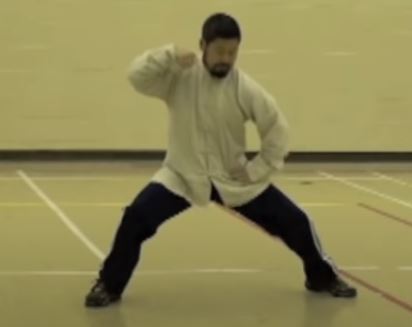
Master Chen begins, “Observe the [reference] line on the floor. Place your hand here.” He demonstrates the starting position for the positive circle. “According to the [reference] line, your hand must be angled 45 degrees [from the reference line]. It [the position of the front hand] operates independently of your body; it [the position] follows alignment with the floor. So [for now], don’t concern yourself with your body. [Just make sure that your front hand] is positioned at a 45-degree angle [from the reference line].” |
These positions are illustrated in Figure 11. On the right, Master Chen stands in the ready position. On the left is a schematic diagram highlighting essential landmarks such as the reference line, center line, and the placements of the front hand and foot. The key takeaway is that the front hand must be positioned precisely 45 degrees from the reference line.
Master Chen walks around the room, ensuring everyone’s hand placement is correct and that they maintain the proper stance. He then introduces the first exercise: “At this level, extend your hand fully—stretch your arm out as far as possible. Once you’ve reached your limit, you understand the extent of your reach [in this position]. Now, to create the bow curvature, avoid bending your wrist. Stretch it [the section from the elbow to the fingertips] out, and extend this [section from the shoulder to the elbow] as well. We achieve the bow shape [through the positioning of the elbow]. Only bend your elbow—never your wrist.”
| Figure 12 illustrates Master Chen beginning with his arms fully extended, then retracting his elbow while keeping his fingers outstretched. A green line highlights the importance of maintaining a straight trajectory throughout the withdrawal. The first two sections of Figure 12 demonstrate the arm’s transition from full extension to forming the characteristic bow shape. |
 |
To illustrate the concept, Master Chen holds the finger of one of his students and explains, “This here [I am holding your finger], imagine it’s fixed [your finger is permanently anchored at this point, so] there’s no movement. Now bend your elbow.” As the student does so, Master Chen moves along with the elbow while maintaining his hold on the finger. “This [anchor on the finger] is completely locked. This [lock] creates a restriction that leads to freedom. You restrict here [at the finger], which makes this [the elbow] extremely flexible. Whatever movement I apply [through your fingers], you respond [using movement from your] elbow. [Due to this restriction principle, you will] never use your wrist again [to counter a push or pull on your hands].”
In the last two sections of Figure 12, Master Chen grips the student’s extended arm and maintains this hold as the student retracts his elbow. His steady grip offers the student the necessary feedback to preserve the stretch in the hand.
Master Chen uses mechanical analogies, like a cleaver and a jackknife, to clarify this idea. “[When using a cleaver to cut,] movement occurs in the hand; the handle and the cleaver itself [remain] stationary. When opening a jackknife, the lock engages, preventing further movement.” He observes, “Anything that functions as a weapon, in this sense, cannot move.”
 |
Figure 13 offers a step-by-step visual guide to crafting the seven-inch knife. Beginning at the far-left section of the illustration, marked with a green highlight, Master Chen initiates the demonstration.
“This hand here, from the base of your little finger…” he begins, referring to the area shown in the first panel. |
In the second segment of the figure, Master Chen points directly to the base of the proximal phalanx of the little finger and continues, “…down to this knuckle here,” as he gestures toward the head of the ulna, which is clearly indicated along the underside of the palm.
Moving to the third panel, Master Chen elaborates: “This [length] here [is about 3 inches]. You can go home and measure it [this distance]. … So this area,”—his finger tracing the exact space shown in the figure.
In the final segment of Figure 13, his arm is fully extended, visually mapping the underside of the palm, the head of the ulna, and the three-inch stretch along the forearm. “This,” Master Chen concludes, “is called a seven-inch knife. When you tighten [by stretching out the hand], you can feel this [the area of the seven-inch knife]. This [procedure of stretching to create tension in the seven-inch knife area] is called ‘sit the wrist.’ You’ve seen this term many times.”
To demonstrate, Master Chen firmly grasps one wrist with his opposite hand, then extends the fingers of the restrained hand. “Sit the wrist means this [this wrist cannot move],” he explains, emphasizing the restriction. “I grab myself here [grabbing my wrist to emphasize restricting its movement] … and then stretch [the fingers away from the wrist].”
 |
“This part [seven inches including the back of the palm and the forearm] functions like the blade of a knife,” Master Chen explains. “[You notice that when there is maximum tension, the fingers and the palm exhibit] a slight curvature,” a natural result of sustained strain. Figure 14 visually reinforces this concept with a close-up of the forearm. It captures the stretch-induced curvature that develops through consistent training—a mechanical imprint etched by repeated motion. |
| To deepen the analogy, Master Chen compares this process to the evolution of a tool: “Even a straight-edged knife, after repeated sharpening and prolonged use, develops a curvature. This happens naturally over time due to wear. Because you always make the same motion, that section gradually conforms. Once you have that [curvature, you can assume there is enough tension and stretch on your hand].” The curve of the arm can be compared to a typical Chinese cleaver as shown in Figure 15. |
 |
“The seven-inch knife must remain unmoved.” Master Chen demonstrates this principle with a student. He instructs, “Grab and pull me.” The student grips Master Chen’s forearm and pulls. Master Chen explains, “The movement is here.” The reaction occurs at the elbow, not the forearm. The same applies to a push. Master Chen then directs his student, “Push me.” The student presses against Master Chen’s forearm. “The movement is here,” he reiterates, showing that his response to the push originates at the elbow.
 |
Master Chen summarizes the concept: “Never move here [at the seven-inch knife area] anymore. So this [idea of not moving at that part of the body] is very important.”
In Figure 16, the first section illustrates the initial position of the ‘seven-inch knife,’ indicated by a green line. The second and third sections show the elbow’s motion in response to a push—both the forward movement and the reactive action—also marked in green. |
Master Chen introduces a training exercise called “grabbing your own wrist” to illustrate a key principle. He tells his students, “Grab yourself like this,” instructing them to grasp their forearm with the opposite hand.
Master Chen introduces a training exercise known as “grabbing your own wrist” to demonstrate a key principle in movement. He instructs students, “Grab yourself like this,” prompting them to clasp their forearm with the opposite hand. He explains, “This here [where you are grabbing yourself], no more move. [Imagine] if somebody pushes you [at the held location], move your elbow [backward in response]. [If] somebody [is] pulling you, release your elbow [and move forward in response].”
Figure 17 consists of three sections illustrating the exercise:
|
 |
Master Chen explains his concept by referencing the motion involved in swinging a baseball bat. He notes, “Just like grabbing a baseball bat—the bat itself doesn’t move.” The movement, he clarifies, occurs between your hand [which holds the bat] and your joints [that connect the hand to the body]. When performing the action [swing the bat], the bat remains stable; it no longer exhibits a loose motion [wobble and wave during the swing], because it is a solid, rigid structure [since the bat is a rigid structure].
 bat vs. a whip |
He then contrasts this controlled, bat-like motion with the flexible dynamics of a whip, stating, “We are not using a whip-like action,” which involves elasticity between the handle and the endpoint. Instead, Master Chen draws attention to a different principle: “We are using a knife-like action.” He explains the reason behind this: “Because when you do this [move your hands], [this hand movement] is loose.” |
Such looseness, he says, is instinctive—”That ability comes naturally—we don’t [have to] train it.” While most people intuitively understand how to perform this loose motion [wave the hands], few grasp the subtle discipline required to maintain stability in more focused movements [keep the seven-inch knife steady].
Figure 18 visually contrasts these two action types—highlighting the difference between whip-like flexibility and knife-like precision
Master Chen observes his students’ movements and instructs, “So keep it [the seven-inch knife area] firm.” Master Chen explains while the movement of the ‘seven inch knife’ is restricted, there is more flexibility for the movement of the elbow.
Master Chen described another type of elbow movement, which begins with a quick push on the elbow. He instructs: “Absolutely no loosening [at the hand]. [Be] strong. And only rotate [at the elbow].” This rotation is a sharp sideways motion of the elbow—distinct from a simple linear back-and-forth. “Don’t pull [with your hand]. Rotate [sideways movement of the elbow],” he emphasizes.
Master Chen then explains the effect of this kind of response: “If I [continue to] fight you [by continue to push on your hand], [if your action is to maintain a immobile seven inch knife and rotate with your elbow,] you’re still strong.”
He describes how the movement progresses into a counteraction toward the opponent. While a natural reaction [to the opponent’s push] might be to push [from you], Master Chen cautions: “Do not push [with your forearm]. Rotate your elbow [outwards to squeeze your opponent out]. Rotate. Can you see? Different kinds of rotation.”
To illustrate this, Master Chen demonstrates multiple forms of rotation using various parts of the body. “Train. Different kind of rotation. Until you have the flexibility [to carry out those rotations].”
Master Chen summarized, “This knife is very strong,” while demonstrating the act of holding an imaginary knife. “When you’re holding a knife, you can do whatever you want. But the knife [that I am holding in my hand] never moves. So train your wrist until it no longer moves.” This embodies the primary objective of the ‘holding your own wrist’ exercise.
He reminds his students: “Lots of elbow… no shoulder… Train the elbows first… if the hand moves, there is no knife.”
8. Indirect Power
Master Chen then introduces the concept of indirect power. He begins, “There is a knife, but the power comes from here [at the elbow not at the hand]. It [Power] is not local.”
He elaborates further, “Power is never local. Local means something like this here [my hand hitting your chest]. [Rather,] it’s here [my hand touches your chest, then] no move [at the point of contact. Power,] it comes from [movement away from the point of contact]. You see, it [the power] comes from the inside here [the area behind the contact point, my waist and my foot].”
Master Chen then offers a physical analogy: “Local means when you’re holding a baseball bat. You place it [the bat] here [somewhere on your opponent’s body]. The bat itself cannot move—it’s either me pushing it [the bat into my opponent], or it’s me swinging it [the bat].”
Master Chen attempts to explain the concept of indirect power from a different angle. “When you do this here [keeping the principle of indirect power] over a long time, the sensation—or the effect—we aim to create is that there will be two of you. Sounds crazy, right?”
He then elaborates by pointing to his palm and forearm. “This [hand and forearm] is a knife, [it] does not move.” Next, he gestures toward his torso. “This is your body. Your body can move.”
 |
He demonstrates by moving his body while keeping his ‘seven inch knife’ stationary. Then he shifts the ‘seven inch knife’ in coordination with his body, clarifying, “The body can move the knife.” Figure 19 illustrates this concept. The left section shows the initial position, with the ‘seven-inch knife’ clearly visible. In the right section, the figure depicts body movement while the knife remains stationary. The green lines emphasize the idea of ‘Creating two of you‘ – that is separating any action into two sections. |
To contrast this, Master Chen demonstrates a typical, incorrect movement where both the body and the ‘seven inch knife’ move freely together. He comments on the flaw: “Otherwise, can you see, there’s only one of you [when everything is moving without restrictions.] It [the various parts of the body] is all the same.”
|
He reaffirms the core principle: “It’s very, very important that you produce two of you … a pair. Eventually we want to make eight of you. That is the nature of Taiji fighting.” This conclusion gestures toward the deeper Taoist notion of Yin-Yang separation.
Master Chen offers a mechanical analogy to illustrate the nature of Taiji fighting: “If there are eight of you, you become like a gearbox. Whatever enters will be chewed up. If we don’t call it a gearbox, then think of a small blender. You put the coffee beans in—it comes out as coffee grounds. You put vegetables in—it becomes a purée. If you put fruits in, you get fruit juice.” Figure 21 presents the metaphorical image described above. |
 |
“So this here is a concept you need to take home and train. My advice is… follow a system.”
Master Chen then describes one possible system: “If you’re someone who enjoys working on projects in your garage, here’s an idea. Take a piece of wood and shape it to the desired form [of the seven inch knife], then attach velcro to it [so you can attach this piece of wood to your hand]. Each day when you get home, place your hand on the wood and secure it to your hand and arm with velcro in three spots [so now the shape of your hand and forearm is fixed by the shape of the wood]. Then, go about your tasks [with this piece of wood attached to your arm].
This restriction [of your hands and arms] paradoxically creates new freedom for your body. The movements you’re used to—suddenly, they’re no longer possible due to the adjustment.”
 Normal vs. Taiji |
Master Chen re-emphasizes the critical value of restriction in combat, explaining: “So can you see, you’re forcing your body to move [because of the restrictions on the hand]. This is extremely important in fighting. The body must move. Normally, we’re very lazy in fighting. We prefer to do this [reach out and punch and kick].”
As illustrated in Figure 22, Master Chen demonstrates several typical jabs and feints, followed by a sequence of Taiji movements that engage the entire body. |
|
He elaborates: “We want the whole body to be here [driving the elbow into the opponent]. We want everything to move together [according to Taiji principles], not just like this here [an elbow strike using only the power of the shoulder].” Figure 23 further highlights the contrast between isolated elbow movements and the full-body coordination essential for executing an effective Taiji elbow strike.
Master Chen concludes by emphasizing the principle of “sitting the wrist”: “This is very important. Restricting the wrist allows the body to begin to feel that it must move.” |
 Normal vs. Taiji |
9. Self-directed Positive Circle
 |
Master Chen begins, “Let’s form the [positive] circle, maintaining a steady wrist—‘sitting your wrist’.” He then introduces the Self-directed Positive Circle exercise, in which the guiding hand steers the active hand into proper alignment through each segment of the circle. Figure 24 depicts the initial stance: Master Chen, positioned on the right side, assumes the correct posture—the right hand, designated as the active hand, extends 45° from the reference line, while the left hand, serving as the guiding hand, rests near the left kua. |
Master Chen then outlines the sequence for this exercise. Figure 25 illustrates both the starting and ending positions of the first step in the [positive] circle. He explains the movements as follows:
“[In the first step – ‘In With Elbow’:
|
 |
The green line shown in Figure 25 highlights the essential role of maintaining the ‘seven inch knife’ or the ‘sitting of the waist’ throughout this initial step.
 |
[In the second step – ‘Turn with Waist’] use this [guiding] hand [to] grasp the [front] side of your stomach. [The guiding hand] pulls [the side, resulting in your waist turning to the left]. Keep your [active] hand extended behind. [This means the hand should remain stationary and continue pointing in the same direction.] The left section of Figure 26 illustrates this action, with the green dot emphasizing that the active hand’s aim must remain unchanged. The right section depicts the beginning phase of the third step. |
| [In the third step – ‘Out with Hand’] [Remove your guiding hand from your front side and] grasp the fingers [of your active hand.] [Use your guiding hand to] pull it [your active hand] outward [returning to the starting position]. That completes the [procedure for the self-directed] positive circle.” Figure 27 visually captures this final movement—showing how the guiding hand draws the active hand outward before returning to the initial posture. |
 |
Master Chen further clarifies, “You don’t actually perform the circle like this. This is a method to show you how it moves—meaning there are three [discreet] movements.” This Self-directed Positive Circle exercise also reinforces the principle of indirect power. The active hand does not move on its own; its motion originates from the guiding hand—an indirect source of power.
Master Chen then re-demonstrates the three movements of the [positive] circle—this time without using his guiding hand—to underscore the significance of clearly defined phases.He begins:
 |
“It’s very, very important that in the beginning, there are three [discreet] movements. Let me show you what I mean.
This is [what] you saw, right? [Three distinct moves.]” |
Figure 28 visually represents this sequence, with green lines highlighting the distinct motions that form the positive circle.
| Master Chen remarks, “This is not what we want to do.” Figure 29 illustrates him executing the same sequence once more—this time with the movements seamlessly blended, lacking distinct transitions. Although the motions appear fluid, the red lines highlight the incorrect techniques. These subtle violations undermine the foundational principles of the Practical Method. |
 |
Master Chen provides additional detail on this exercise: “For your first move, do not move anything else on your body [except the elbow].”
He continues, “The second move—[there is a relationship between] three points [the front elbow, the front kua, and a point on the waist]. Do not move anything else. Can you see that everything else stays in place? [That is, the three points relationship did not change, the hand direction did not change as the waist turns.]”
Master Chen then cautions, “So do not do this here,” and demonstrates an incorrect motion where the hand shifts from its original position.
He resumes, “[Third move, ‘Out with Hand’] everything is synthesized.”
10. Humans (人) becomes big (大)
Master Chen offers another perspective on the three movements, explaining: “Number one is one [part]. Number two [is] two parts. Number three [is] everything on the body [which means it] is three parts.”
 |
He elaborates, “Everything on the body—three parts.” Standing in a shoulder-width parallel stance, he continues: “There are only three parts. One,” he points to his left leg. “Two,” he points to his right leg. “Three,” he traces a line down the center of his body. “The basic structure is three parts,” referring to the left leg, right leg, and the body’s center.
To further illustrate the concept, he extends his arms out to the sides and remarks, “When you do this”—holding the pose—“this position is equivalent to having the legs spread out.” Figure 30 captures Master Chen in this stance, emphasizing the three key segments of the body. |
|
Figure 31A presents an idealized depiction of Master Chen’s posture: a figure standing with legs shoulder-width apart and arms extended horizontally. To illustrate bodily symmetry, the midsagittal plane is overlaid, dividing the figure evenly into left and right halves. Additionally, a transverse line—serving as a mirror line—is drawn to highlight symmetry between the upper and lower body.
Building on the anatomical model, Master Chen sketches a minimalist abstraction on the whiteboard, reproduced in Figure 31B, to deepen the discussion of symmetry in Taiji practice. |
 |
His drawing consists of three intentional strokes: one slanted downward from the upper left to represent the left leg, another slanted downward from the upper right to depict the right leg, and a vertical line connecting the point where the two leg strokes converge. This simple structure suggests both a standing human figure and the form of the Chinese character for “man” (人).
Master Chen elaborates on this abstraction by introducing a horizontal line crossing the vertical stroke, representing the placement of the arms. This addition transforms the initial figure into the character for “big” (大), visually reinforcing the connection between human posture and symbolic meaning. As he explains, “This is the human body. Whenever you place two [lines] here for the arms, they should normally be here [positioned horizontally] when you do this [raise your hands, so that the orientation of the arms mirrors the directions of the legs].” The completed representation is shown in Figure 31C.
Through this analogy, Master Chen illustrates how the principle of left-right symmetry—central to Taiji movement—provides the visual and structural foundation for both the character for “man” and its transformation into the character for “big.” He emphasizes the significance of Figure 31C by introducing the complementary concept of top and bottom. He explains, “If you draw a [horizontal] dotted line [across the center of the figure] as a reference point, you’ll see that this part here [the section below this reference line is a mirror image of the section at the top of the reference]—it’s one [the arms] on top, one [legs] at the bottom. Now you understand, yes or no?”
Master Chen once again assumes a parallel stance and says, “See this shape here,” prompting his students to observe his whole body. “Your feet and hands are the same. [This idea appears to be difficult to understand because] here [there is] no point of reference.”
 |
To clarify, Master Chen introduces a visual analogy: “Now, let’s say you raise the floor up to here [to your waist]. [Now imagine that] everything [that] is underneath [your waist,] you cannot see anymore. When you do this [spreading out your arms], that’s exactly that one [the same as the legs]. They are the same. [They are mirror images of each other.] One [set of appendages in this case arms] is on top, one [set of appendages in this case legs] at the bottom, [but] reversed [one set of appendages pointing up and the other set pointing down].” |
| Standing in a parallel stance with arms at his sides, Master Chen continues: “When you look at the basic structure [of my parallel stance], it [,the main structure,] consists of three parts. [The two legs and the center line.] Now you got that?” He then underscores the importance of this framework, adding, “If there are three parts, your actions must [also] have three parts.” |
 |