
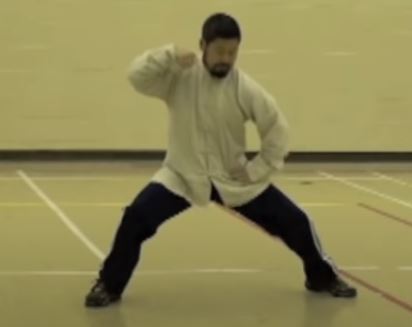
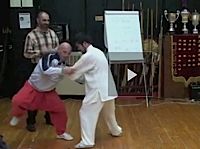
Partner exercise to train getting in
Presenter: Chen Zhonghua Length: 10 min. In: English Year: 2016 Difficulty:1/5 At:Vancouver
“Step Up To Ji” Online Video Trailer
Previous post: Kelvin Ho Yilu in Toronto on Nov. 6, 2016
Next post: North American Practical Method Training Camp July 28 – Aug 1, 2017
{ 37 comments… read them below or add one }
Please start commenting and asking questions after you have reviewed the video, even it is before the scheduled time, no time limits here. Thanks
My notes on the video:
Get in without fighting/pushing against the opponent’s power. Keep the original point of contact with the opponent’s power. Use the power to advance.
First drill: keep the hands in place, advance the feet and body.
Second drill: on the touch, keep the hands in place, advance the elbow/body to match the touch. Don’t move your hands. Don’t push. Extend your arms first so that you have room to advance your elbow/body. Quickly and lightly. Cover lots of distance. Go down to advance.
Third drill: now keep the forearm in place, go down to advance the body. Gain below with the foot, don’t lose or fight with the forearm. The elbow withdraws with rotation when maintaining the forearm position. The follow-up to this drill is once the foot is in position, it allows the arm to have leverage.
Analogy to a crowbar: you should not try to pry before wedging it in position. Once in position, it has a lot of power. The rhythm should match the opponent. His push sets up your foot; when he stops, you pry him.
Edward, you said “First drill: keep the hands in place, advance the feet and body.” In advancing the body he referenced 3 points to move at 1:41…here, here and here…what 3 points was he referring to?
Right, the elbow, shoulder and kua act to advance the feet and the body.
Yes!!!
Good points to recognize:
-Where is the fight (where are they fighting, where are you fighting?)
-How can you get past the point of differentiation?
-How to separate different body parts without getting caught
-What to move/what not to move
-Paying attention to the feet
Great video!
…you do that alot Brennan!!! I have been able to get in on you and lock up your top. It worked for a year, then you developed the ability to “not move your top, while taking the space below” (upper+lower body separation) just like the the crowbar analogy…lots of power and hard to detect until it is too late!
Very clear on what is fighting and what is withdrawing…is that then matching…listening???
:30 Steps
1. Lock hands on opponent or on a fixed point.
2. Use elbow, shoulder, and Kua.
3. Step forward and back
3:25 Steps
1. Step forward and back (again, hands should be locked on a fixed point: they don’t move).
2. When stepping forward leg goes behind opponents leg, taking up space without them noticing
3. Move quickly and lightly
5:40 Steps
1. Taping arm and elbow
2. Step forward (inside)
3. Elbow rotates slightly as you move forward, but the elbow does not move.
Principles Being Taught:
Sequential movements
You’re not fighting and you’re not retreating/withdrawing. You’re taking up space, matching, and listening.
Using power makes the rhythm off.
Observations/Questions: What would you recommend doing if I can’t stop moving my hands when I step forward?
“2. Use elbow, shoulder, and Kua”, very significant point!
To stop your hands from moving you could start the exercise by fixing your hands on a wall for a hundred or so repetitions. Then have a long piece of tape or a stick in front of you where it can be used as a physical point of reference to do the exercise several more repetitions. Video record yourself doing it. When you see your hands are not moving, do it without the reference point, imagine your hands touching something…
Thank you Randi for participating! She is my student and shows much willingness to learn!
We will have an online class based on this video using the comment section of this video at 10:30 am Central Time, 11:30 pm Eastern Time on Saturday, April 4, 2020. On the days that I am teaching, I have selected a series of videos that will be taught in a sequential manner. The primary emphasis will be improving your understanding of how to take an opponent’s space that utilizes the principles that are inherit to Chen Style Practical Method Taijiquan. The video’s include:
1. Step Up To Ji
2. Move Where He Is Not.
3. Warping 2 Energy
4. Dimensions: 5 Points.
5. Proportional Movements.
In the first video, Step Up To Ji, Master Chen teaches students a method of how to take space from an opponent. He teaches 3 different exercises during :30, 3:25 and 5:40 of the video. For those participating this Saturday, write down the steps for each exercise and practice them. Identify and write down the principles that you see being taught. Following that write down observations and/or questions to post. Additionally, when you have practiced, I recommend that you make a short 1 minute video of yourselves doing each of the exercises. If you wish, you can send them to me for feedback.
Related posts:
Step Back to Double Shake Feet (step-by-step)
Your Next Step After A Workshop
Half-Step: Integration of Technique and Power
Post Category: Application Learning Method Principle, Technical
{ 9 comments… read them below or add one }
John Upshaw April 2, 2020 at 7:43 am [edit]
Please start commenting and asking questions after you have reviewed the video, even it is before the scheduled time, no time limits here. Thanks
REPLY
Edward Liaw April 2, 2020 at 4:33 pm [edit]
My notes on the video:
Get in without fighting/pushing against the opponent’s power. Keep the original point of contact with the opponent’s power. Use the power to advance.
First drill: keep the hands in place, advance the feet and body.
Second drill: on the touch, keep the hands in place, advance the elbow/body to match the touch. Don’t move your hands. Don’t push. Extend your arms first so that you have room to advance your elbow/body. Quickly and lightly. Cover lots of distance. Go down to advance.
Third drill: now keep the forearm in place, go down to advance the body. Gain below with the foot, don’t lose or fight with the forearm. The elbow withdraws with rotation when maintaining the forearm position. The follow-up to this drill is once the foot is in position, it allows the arm to have leverage.
Analogy to a crowbar: you should not try to pry before wedging it in position. Once in position, it has a lot of power. The rhythm should match the opponent. His push sets up your foot; when he stops, you pry him.
REPLY
John Upshaw April 2, 2020 at 7:59 pm [edit]
Edward, you said “First drill: keep the hands in place, advance the feet and body.” In advancing the body he referenced 3 points to move at 1:41…here, here and here…what 3 points was he referring to?
REPLY
Brennan Toh April 2, 2020 at 7:14 pm [edit]
Good points to recognize:
-Where is the fight (where are they fighting, where are you fighting?)
-How can you get past the point of differentiation?
-How to separate different body parts without getting caught
-What to move/what not to move
-Paying attention to the feet
Great video!
REPLY
John Upshaw April 2, 2020 at 8:07 pm [edit]
…you do that alot Brennan!!! I have been able to get in on you and lock up your top. It worked for a year, then you developed the ability to “not move your top, while taking the space below” (upper+lower body separation) just like the the crowbar analogy…lots of power and hard to detect until it is too late!
REPLY
John Upshaw April 2, 2020 at 7:48 pm [edit]
Very clear on what is fighting and what is withdrawing…is that then matching…listening???
REPLY
Randi Smith April 3, 2020 at 5:27 am [edit]
:30 Steps
1. Lock hands on opponent or on a fixed point.
2. Use elbow, shoulder, and Kua.
3. Step forward and back
3:25 Steps
1. Step forward and back (again, hands should be locked on a fixed point: they don’t move).
2. When stepping forward leg goes behind opponents leg, taking up space without them noticing
3. Move quickly and lightly
5:40 Steps
1. Taping arm and elbow
2. Step forward (inside)
3. Elbow rotates slightly as you move forward, but the elbow does not move.
Principles Being Taught:
Sequential movements
You’re not fighting and you’re not retreating/withdrawing. You’re taking up space, matching, and listening.
Using power makes the rhythm off.
Observations/Questions: What would you recommend doing if I can’t stop moving my hands when I step forward?
REPLY
John Upshaw April 3, 2020 at 6:01 am [edit]
“2. Use elbow, shoulder, and Kua”, very significant point!
To stop your hands from moving you could start the exercise by fixing your hands on a wall for a hundred or so repetitions. Then have a long piece of tape or a stick in front of you where it can be used as a physical point of reference to do the exercise several more repetitions. Video record yourself doing it. When you see your hands are not moving, do it without the reference point, imagine your hands touching something…
Kelvin Ho April 3, 2020 at 3:17 pm [edit]
Please put the comments on the video page and not on this page
We will have an online class based on this video using the comment section of this video at 10:30 am Central Time, 11:30 pm Eastern Time on Saturday, April 4, 2020. On the days that I am teaching, I have selected a series of videos that will be taught in a sequential manner. The primary emphasis will be improving your understanding of how to take an opponent’s space that utilizes the principles that are inherit to Chen Style Practical Method Taijiquan. The video’s include:
1. Step Up To Ji
2. Move Where He Is Not.
3. Warping 2 Energy
4. Dimensions: 5 Points.
5. Proportional Movements.
In the first video, Step Up To Ji, Master Chen teaches students a method of how to take space from an opponent. He teaches 3 different exercises during :30, 3:25 and 5:40 of the video. For those participating this Saturday, write down the steps for each exercise and practice them. Identify and write down the principles that you see being taught. Following that write down observations and/or questions to post. Additionally, when you have practiced, I recommend that you make a short 1 minute video of yourselves doing each of the exercises. If you wish, you can send them to me for feedback.
Related posts:
Step Back to Double Shake Feet (step-by-step)
Your Next Step After A Workshop
Half-Step: Integration of Technique and Power
Post Category: Application Learning Method Principle, Technical
{ 9 comments… read them below or add one }
John Upshaw April 2, 2020 at 7:43 am [edit]
Please start commenting and asking questions after you have reviewed the video, even it is before the scheduled time, no time limits here. Thanks
REPLY
Edward Liaw April 2, 2020 at 4:33 pm [edit]
My notes on the video:
Get in without fighting/pushing against the opponent’s power. Keep the original point of contact with the opponent’s power. Use the power to advance.
First drill: keep the hands in place, advance the feet and body.
Second drill: on the touch, keep the hands in place, advance the elbow/body to match the touch. Don’t move your hands. Don’t push. Extend your arms first so that you have room to advance your elbow/body. Quickly and lightly. Cover lots of distance. Go down to advance.
Third drill: now keep the forearm in place, go down to advance the body. Gain below with the foot, don’t lose or fight with the forearm. The elbow withdraws with rotation when maintaining the forearm position. The follow-up to this drill is once the foot is in position, it allows the arm to have leverage.
Analogy to a crowbar: you should not try to pry before wedging it in position. Once in position, it has a lot of power. The rhythm should match the opponent. His push sets up your foot; when he stops, you pry him.
REPLY
John Upshaw April 2, 2020 at 7:59 pm [edit]
Edward, you said “First drill: keep the hands in place, advance the feet and body.” In advancing the body he referenced 3 points to move at 1:41…here, here and here…what 3 points was he referring to?
REPLY
Brennan Toh April 2, 2020 at 7:14 pm [edit]
Good points to recognize:
-Where is the fight (where are they fighting, where are you fighting?)
-How can you get past the point of differentiation?
-How to separate different body parts without getting caught
-What to move/what not to move
-Paying attention to the feet
Great video!
REPLY
John Upshaw April 2, 2020 at 8:07 pm [edit]
…you do that alot Brennan!!! I have been able to get in on you and lock up your top. It worked for a year, then you developed the ability to “not move your top, while taking the space below” (upper+lower body separation) just like the the crowbar analogy…lots of power and hard to detect until it is too late!
REPLY
John Upshaw April 2, 2020 at 7:48 pm [edit]
Very clear on what is fighting and what is withdrawing…is that then matching…listening???
REPLY
Randi Smith April 3, 2020 at 5:27 am [edit]
:30 Steps
1. Lock hands on opponent or on a fixed point.
2. Use elbow, shoulder, and Kua.
3. Step forward and back
3:25 Steps
1. Step forward and back (again, hands should be locked on a fixed point: they don’t move).
2. When stepping forward leg goes behind opponents leg, taking up space without them noticing
3. Move quickly and lightly
5:40 Steps
1. Taping arm and elbow
2. Step forward (inside)
3. Elbow rotates slightly as you move forward, but the elbow does not move.
Principles Being Taught:
Sequential movements
You’re not fighting and you’re not retreating/withdrawing. You’re taking up space, matching, and listening.
Using power makes the rhythm off.
Observations/Questions: What would you recommend doing if I can’t stop moving my hands when I step forward?
REPLY
John Upshaw April 3, 2020 at 6:01 am [edit]
“2. Use elbow, shoulder, and Kua”, very significant point!
To stop your hands from moving you could start the exercise by fixing your hands on a wall for a hundred or so repetitions. Then have a long piece of tape or a stick in front of you where it can be used as a physical point of reference to do the exercise several more repetitions. Video record yourself doing it. When you see your hands are not moving, do it without the reference point, imagine your hands touching something…
https://youtu.be/nzG3AQHYIg0
An additional drill
Will it be more closer to the goal of the drill to have the rubber cord on the hands/palms rather than the waist? So that the actions of moving with the other parts (elbow, shoulder and kua) are completed with the criterion of holding the hands/palms position fixed in space? (… with an external reference, such as a floor lamp as a physical marker?)
If the purpose is to increase the difficulty of moving the waist forward (with the resistance) it is a very good idea. Two rubber cords then? One for the waist and one for the hand?
Anyhow, as a famous Chinese medical practitioner once said, “We need to focus on what the Master is teaching and not come up (be distracted) with our own stuff.” Brennan Toh also provided an excellent comment on what to focus on:
Good points to recognize:
-Where is the fight (where are they fighting, where are you fighting?)
-How can you get past the point of differentiation?
-How to separate different body parts without getting caught
-What to move/what not to move
-Paying attention to the feet
And, I would add, “-Which of the many principles and concepts are you applying”.
I did get permission for Master Chen to post the rubber cord drill. With that being said, I can tell that I am not ready for that. I could see lots of movements in my knee and the elbow, shoulder and kua actions were not proportional (too much shoulder). Therefore, I am not going to jump ahead until I have the first exercise correct. Good points James.
That is what I initially thought to do with the cord, too, with the cord providing feedback if there is movement of the hands.
Good questions and suggestions James. I think the rubber cord on the waist trains the lower body. I also think it bring a level of difficulty in lower body/ upper body separation, which is one of the principles this drill trains with or without the cord. As you see I did have difficulties maintaining no movement with the hands. I need to experiment with the other rubber cord application uses you suggested….beings I am not training with a live person for the time being.
Not moving the hands is a major struggle for most of us (including me), but it’s one of the first lessons.
At 6:20, Master Chen says “he’s here, I’m there” and at 7:20, “gain the foot, don’t fight the arm”. How are these examples of separation, which is inherit to Practical Method?
https://youtu.be/_EVSpGvDxPU
Please give feedback according to what you learned from the video. Please post your own videos of the drills taught in “Step up to Ji”.
https://youtu.be/ooeBgcraQGA
Edward, nice job on the 1st exercise! The only feedback I can give you on that is to keep your head up all the time. When you step back you looked down a few times, which creates “slack”. The times you kept your head up, you maintained your “fullness”.
In the second drill, your in with elbow was great. It was lead by the elbow, which is suggestive of the rotation Master Chen mentioned in the video. However, there was no separation of movements. When the elbow comes in, the heel goes out***the upper body does not move***. This is where we develop upper body/lower body separation and synchronized desynchronization***VERY IMPORTANT principles in Practical Method. After the elbow is in and heel is out, you can close (land) your knee and toe, pull up your rear foot, and out with hand. This trains our segmentation in movements.
Thank you for posting and your participation!!!
Thank you! I didn’t see that before.
The particular aspect that Edward did very well was the knee stayed on top of the heel as he pulled the body up.
I saw a corner wall there. You can put your forearm on that wall, and pull your foot on the side and pull yourself up. This way your body can go up beyond where the forearm is on the wall.
Good observation Kelvin. By video taping myself, I noticed this is an issue I need to work on…front knee moves forward slightly. We shall see if 100 of this drill a day will address that issue! I’ll post abother video next Friday.
Edward Liaw said in in the first drill we:
1. Get in without fighting. Master Chen makes it very clear what is fighting and what is withdrawing.
2. We push against the opponent’s power. In the first drill it is establishing fixed points. When this is done in an opponent, we are “matching” the opponent’s power 51/49 ratio. When we continually adapt to the opponent’s movements with this matching, then we are “listening”…all skills and abilities that are inherit to Taijiquan.
3. Edward said advance the feet and body. He later amended, “the elbow, shoulder, and kua act to advance the feet and body”. This is very significant as it is one of practical method’s primary principles***Indirect Power***
Excellent video and discussion. This has really helped me to see the concepts more clearly.
I just noticed at about 11 min in the video as Master Chen discussed the rhythm. It seems that as we move in without fighting, the opponent is induced into feeling he has completed his move. That is the point in the rhythm that we push on the lever we created, which goes into our opponent at an angle to the direction of his push. It’s not a direct fight to the opponent.
I think most of us have heard Master Chen comment on helping the opponent complete his move. Here we see that applied in the proper rhythm as a finish to the second half of positive circle. Or is it more precisely the last third of the positive circle?
Yes, I think it is the last third of the circle. Good points Gerry on when not to use power.
Thank you all for participating! Next time we will be discussing the video lesson “Move Where He Is Not”.
https://youtu.be/D7kJ3idDGBM Sorry for not getting here sooner. I really appreciate what you doing here!
Thanks for posting Travis. In the 1st drill I see your hands not moving while you are advancing and expanding backwards, main point off the drill! Structurally, I think you need to bend your waist forward some as your shoulders and upper back are protruding backwards. Any compression placed on you will go towards the protrusions and indentations.
In the second drill, the timing of actions, in with elbow out with heel seem on cue. The elbow comes in with rotation as Master Chen said in the video. I think that increasing your range is a way for you to make progress on this drill. This implies out with heel more without the body following while in with elbow more…these two actions are separate actions yet at the same time the are one…henceforth, the out with heel and in with elbow needs to be proportional.
For me, I noticed a lot of movement in my front knee. I plan on doing this drill 100-200 times per day. At the bend of the the week I’m going to post another video to see if progress was made. I encourage you to do the same.
Keep on training and hope to see you next week!
Thank you! I will do the same!
Thank you for highlighting these set of exercises to close in on an opponent. All the points that Brennan Toh listed are imperative to making it possible to take up more space from the opponent. Excellent points brought out by everyone.
When pushing hands I always make the mistake of trying to take up space without meeting where the fight is, not being successful in separating the top from the bottom. I’m trying to pay too much attention to my feet to try and get past that point that I think is the point of differentiation. However, that point of differentiation is not created unless I meet the opponent where the fight is. What ends up happening? I end up being bounced off.
Here’s my go at the first exercise in this great video by Master Chen. There are so many mistakes but it was great to see it.
https://youtu.be/lV5lCR9eaaY
Feedback is most welcome!
And here it is. Day 7 is done.
Day 7 – https://youtu.be/LHQmMm61LnY
Day 1 vs Day 7 – https://youtu.be/o6KVnfw7TJs
Please feel free to provide feedback and spot the differences!