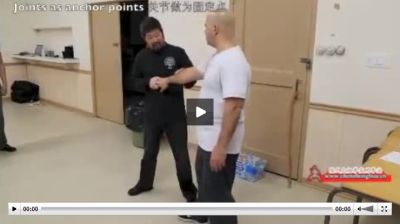
Designating joints as non moving pegs, in yilu and in aplication
Presenter: Chen Zhonghua Length: 15 min. In: English Year: 2014 Difficulty:2/5 At:Toronto
“Joints as anchor points” Online Video Trailer
Previous post: Body and the mind
Next post: Get in, get stuck, turn the waist.


{ 31 comments… read them below or add one }
In this video, Master Chen showed us the concept stretching through the joints, what it took to stretch from end to end in the body, what the impact was by adding a point in space. He introduced the concept of double helix, and what it could do to the opponent. He integrated all of these into our form practice.
See you at 10 am ET on Saturday, April 25, 2020.
Welcome everyone to this video! I have provided the following guided reference. Please feel free to ask any questions related to the video.
0:18 Master Chen showed using the shoulder as one of the anchor points to create a stretch. The other anchor point was at the left side back. As he did an elbow-in, the elbow was stretched against the shoulder, which in turn was stretched against the left side back.
1:03 A rubber band could have a stretch when one end was anchored off something that was not moving. The other end just needed to be pulled away from the anchor point. However, our bodies are not like that. There are joints in between end points. We must anchor the joints in order to create a stretch as Master Chen demonstrated with the rubber band stretched around corners.
I’ve seen this illustration before https://brisbanechentaichi.weebly.com/uploads/4/6/9/4/4694604/9912712.jpg. Although it doesn’t emphasize the anchoring of the joints well, I think it is useful for visualizing the concept.
In that illustration, the structure that represents the arm itself cannot move, and each joint itself has no action. It is the pull of the string itself that causes the structure to change shape. If the structure itself is not solid, but another string itself, it won’t work, or if one of the sticks in the structure is brokern as the string is being pulled, it also won’t work.
I could see the sequential connections…even to the dot in space…I’ve watched this video several times over the years….need to practice this when I with a partner!!!
2:16 Each section between two joints is stretched, so overall, from end-to-end, it is also stretched.
3:33 Master Chen’s right elbow and right knee formed the first stretch. His right hand and right elbow formed the 2nd stretch. This formed the first line.
He described a 2nd line which was invisible, and the two lines formed a double helix. Note that the two lines must cross each other to produce the effect.
I tried to describe the double helix when I was taking notes and I can’t see it. I don’t have a good understanding of this.
It was exactly as Master Chen pointed out on Brennan’s body. The effect was like Brennan being wrapped inside a web, and couldn’t’ move. Keep replaying and watching until you can see it. Otherwise, come back in a month or two and try again.
3:54 Master Chen added a third one. You can see in this case that the outcome has more power. You can have at most 9 of such lines. The opponent will be tangled among them.
4:49 Master Chen’s right hand and right elbow are two dots, and there was one more in the space that he pointed at. The relationshiop among the three dots did not change as he rotated.
Hi Kelvin, I keep writing in wrong spot. This example looks easiest to begin with, but can’t really see it. I’m guessing wrist is pt1, dot in space is pt 2 then Brennans elbow is pt 3. Pt 3 then stretches against pt 2, but can’t see rotation you mention.
5:13 The student’s right wrist, right shoulder, left kua, and another point between his feet.
5:30 We have to train our eyes first [to see what was going on], and eventually our bodies will follow.
I can say that this statement is so true. This video gives us very good practice. If you cannot yet see them, I encourage you to watch again and again until you see those points Master Chen mentioned. It will be like you don’t know what is going on, you can’t match the description with the action. One day, all of a sudden, you see that is exactly as described.
Yes brilliant, this is an interesting phenomenon. I attended my first workshop in 2013 in Berlin. I could not understand anything and was always waiting for MC to show “it” (the magic move that makes you powerful), and was quite disapointed when he was showing moves and drills (like shanging directions in the circle). Now 7 years later when I watch the videos again, I can see that he WAS showing EVERYTHING already, but I could not see it and was completly unaware of my disability to see it at the same time. Very funny lesson for me that translates into many other areas in life.
7:42 Master Chen was holding the student’s wrists, he created a third point in the middle of his upper back. He then stretched his right fingers, which were outside of the original 3 points. This is adding “one” to that struture without breaking that structure.
8:25 Master Chen demonstrated an application with Initial Closing. He got the student’s arm, which formed a line. He pulled in his two elbows, the front kua didn’t move back with the elbows, and created another line poking at the student’s right armpit. These two line met roughly at the student’s armpit.
9:57 Notice that Master Chen did not move his right knee, and his right kua opened.
11:30 Master Chen taught how to apply the idea of pegging, which was locking/anchoring the joints, in our form. When we couldn’t do it, we were moving.
12:34 Master Chen demonstrated how he became longer section by section, and therefore longer overall.
14:15 Eventually, we must be supported in 8 directions 八面支撑。We find in our bodies, one point stretched against another point. While maintaining that stretch, add another stretch somewhere else. Keep adding as much as possible.
14:43 This stretching exercise was exactly like the demonstration using the rubber band. After the two end points aree fixed, add another point in the middle and stretch against the original two end poitns.
15:26 Now try to apply this idea into your first 13 to anchor one point at a time, and keep adding.
I would love to Know how to include this into you moves, are there any other videos that cover this?
You can pick any move to do it. The general idea is this:
1) Lock point 1, stretch point 2 against point 1.
2) Lock both points 1 and 2, stretch point 3 against point 2.
3) Lock all points 1, 2 and 3, stretch point 4 against point 3.
4) and so on.
More specifically as an example.
1) Lock the right hand (you can put it on the wall at the beginning to make sure that it really does not move)
2) Stretch the right elbow against the right hand.
3) Lock the right hand and right elbow, stretch the right shoulder against the right elbow.
4) Lock the right hand, right elbow, and right shoulder, stretch the right kua against the right shoulder.
5) Lock the right hand, right elbow, right shoulder, and right kua, stretch the left kua against the right kua.
6) Lock the right hand, right elbow, right shoulder, right kua, and left kua, stretch the left knee against the left kua.
Hi Kelvin, the example Master Chen gives on Brennan, approx 4 mins in looks the simplest to begin with. Still having trouble really seeing what’s going on though. Master Chen anchors at Brennans wrist and elbow, with 3rd pt in space. I’m seeing wrist as point 1, then dot in space as point 2 and Brennans elbow as pt 3. Master Chen then does something with pt 3. Looks like he stretches against pts 1 and 2, then not sure?
Those 3 points formed a triangle. As the rotation happened, the relationship among those 3 points remained constant throughout. Imagine that you are holding a tray, and you spin yourself around to hit someone. The shape/structure of that tray will not change, and that’s why it can hurt someone. Our problem is that those 3 dots will not be in relatively same positions when we rotate, essentially, the original triangle collapses.
Thanks Kelvin, apologies for getting time wrong, your 10am is our midnight.
It is actually ok. You can post questions at any time.