
 The circle, simply put, is the basis of every move in the Taijiquan Practical Method system. Every action or movement in the form is actually a part or variation of either the negative or positive circle. Therefore, common sense would suggest that one must gain a deep understanding of the circle and its mechanics in order to have any kind of understanding of Taijiquan and its practical applications. Although the circle might be the most fundamental movement of the system, it is also one of the most malpracticed and overlooked basic skills. When one begins to understand the circle, every move in the form can be understood and perfected to meet its actual purpose and function. I would like to discuss my own personal conclusions and understandings of what I think the circle is and how to break it down so that training can become more meaningful and productive.
It is my belief that all Taijiquan players, regardless of their level of ability, should perform the circle in exactly the same sequence and following the same basic principles and guidelines. Quite often different steps and explanations are given to student depending on their ability. I believe this is confusing for students and sometimes detrimental to progress. The only difference between the way an advanced student and a beginner should perform the circle is in the quality of each step. Because a student’s body will move differently depending on whether or not he is sufficiently opened or connected, the moves will seem to have some extra components or flow differently. Nevertheless, they are fundamentally identical.
Before discussing the different steps of the circle, I think it is wise to mention the function of the dantian in relation to the circle. Eventually, higher level practitioners should realize that when used properly, the dantian is a fixed and central part in the body which has the ability to rotate in every direction without moving, much like the center of a ball. Although the dantian and its internal complexities could be discussed in greater length, for ease of learning I will limit the discussion to the waist and how it rotates on a horizontal plane when doing the circle. Through experimentation and observation, I have concluded that the waist/dantian should only rotate into three possible positions when doing the circle, or any other move in the forms for that matter.
I refer to the first position as the neutral position. In this position, the waist is not twisted to the left or to the right but “relaxed” to the center with the lower back pushed out. The other two positions are full 45 degree rotations or twists to either the right or to the left. These two positions can only be achieved by twisting the waist and torso to the furthest extreme possible while keeping the lower body fixed. To be able to do and feel this properly however, the upper and lower bodies must be connected. If the lower back is properly pushed out, the waist’s range of motion will be greatly diminished. This is a good sign as it shows that the upper and lower bodies are both connected. If the body is not sufficiently connected, the waist will rotate loosely and be able to move more than 45 degrees to either side. I believe this is undesirable and in most situations, wrong.
If looked at from this perspective, one can easily conclude that the when the waist is centered in its neutral position, it is only able to make rotations of either 45 degrees to either the left or to the right. In situations where the waist is already fully rotated to either side, the waist is able to make a full rotation of 90 degrees to go into its full opposite direction. This means that if the waist is turned completely to the left and would like to rotate completely to the right, it would have to make a 90 degree rotation to do so. In the explanations below, rotations of the waist will be described in measures of 45 and 90 degree turns.
To better understand the circle, I have broken it down into four basic steps. Even though some might argue that there are more or fewer steps, through my personal experimentation, these four steps are clear and easy understand. By breaking things down, students start with a simple understanding of the foundations. Once fully grasped, these foundations can be added onto and built upon through further exploration and analysis. I’ve broken the circle down into the pulling in of the elbow, two rotations of the waist, and the pushing out of the hand.
The steps below are true for and can be easily applied to both the negative and positive circles with only slight variations in arm positioning. For this reason I will not discuss each circle individually but will give all instructions as if the practitioner was doing a right sided positive circle. Once the positive circle is understood in practice, the practitioner should consciously go through each step and see how they apply to the negative circle.
In with elbow
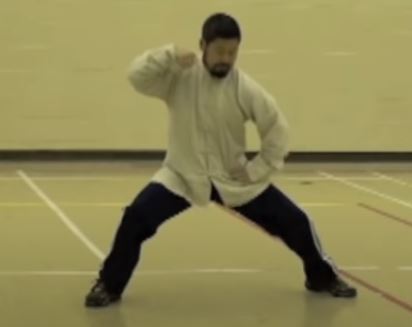
The pulling in of the elbow (in with elbow) is the first step of the circle. Before going into its mechanics though, I feel it is important to describe the initial positioning of the body before starting. The feet should be positioned in a right sided bow stance which means that the opponent would be at a 45 degree angle to the right. The head and eyes should be pointing towards the opponent and the arm should be extended with the elbow and palm both facing down, the latter at 45 degree downward pointing angle. The positioning of the waist and torso here is the main area for concern. Most people tend to also turn the waist and torso 45 degrees to the right to face the opponent. I believe this is wrong and a very common mistake, even among advanced practitioners. The waist or torso should start in its neutral position, pointing away from the opponent. The reason for this is simple. Because the configuration of the feet and lower body are positioned at a 45 degree angle to the right, as are the eyes, the waist must be turned in the opposite direction. If the torso, or waist, is also turned to the right at a 45 degree angle, no twist or spiral is produced to connect the two halves of the body. Also, if the waist and torso face the opponent, the leading shoulder protrudes back and the stretch and connection through the shoulder and into the chest are lost. This can very easily be tried and confirmed. Therefore, every time the practitioner has the intent of pulling in the elbow, or initiating a pull in Taijiquan, it is imperative that the waist/torso not be pointed towards the opponent, but pointed at a 45 degree angle in the opposite direction. Another important factor to remember when pulling in the elbow is that the palm should remain facing down at a 45 degree angle. If the palm rotates and faces upward at this stage, the connection and spiraling of the lower arm is lost and the pull is not as effective.
The pull in Taijiquan seems to be the only movement which is not really initiated by a rotation of the waist. Because the body is in a properly spiraled configuration, the stretched out tendons of the this structure seem to allow the elbow to pull in tremendous amounts of weight without the help of the muscles. The waist positioned at 45 degrees to the opponent ensures that the shoulder does not pop back and that the elbow is pulled and tucked directly into the side of the ribs. As the elbow is pulled in, the front leg should dig and push into the ground to stabilize and power the pull.
A point to remember is that in practical applications, it is actually the rear hand ‘latches on’ to the opponent and does the actual pull. The front hand is used as a guide or lever to help control the opponents’s body or entice him into emptiness.
The first rotation of the waist
The second step of the circle is the first rotation of the waist. When the elbow reaches the side of the rib cage, the whole upper body must lock. Ideally, this lock is a result of the tendons and ligaments of the torso and arms tightening up because of the contracting spirals running throughout the right side of the body. At a lower level however, I would suggest the the locking of the body be ensured by contracting one’s muscles. When everything is locked, the waist must rotate left 45 degrees from its neutral position to a full left rotation. If done properly, the rotation of the waist to the left should tighten up and condense the power into the right side of the body, leaving the rear/left leg moderately relaxed. At this point, what should happen in the practitioner’s body will depend on his level of flexibility and connectivity. At a beginner’s level, the main focus should be to rotate the waist to the left without tossing the torso. At a higher level where the practitioner is relatively connected, several things should automatically happen. First, the 45 degree rotation of the waist/torso to the left should stretch open both kuas and push each knee out into their respective directions. Because both knees are pushed out proportionately, the body should naturally sink on a perfect vertical axis. As this happens, the hand should naturally turn over from a 45 degree downward pointing angle to a 45 degree upward pointing angle. The more connected a practitioner is, the more naturally and proportionately this turning over of the palm will happen.
Second rotation of the waist
When the waist has been fully turned 45 degrees to the left, the first half of the circle will have been completed. At this point, the function of the circle changes from an inward pull to an outward push. To initiate the push, the waist must rotate a full 90 degrees from the left all the way to the right. I believe this is the most difficult step to master as the level of connectivity greatly influences the result and proportionality of the movement. At a beginner’s level, the waist should be rotated to the extreme right while once again focusing on not tossing the torso and keeping the spine vertically straight. The arm should simultaneously be pushed out and and palm rotated downward. At a more advanced level, several things should happen simultaneously. As the waist turns right, the knees should once again push out into their respective directions and the body naturally sink even more. As the body sinks on its axis without tossing, the hand must push out with the palm going from a 45 degree upward pointing position to a perpendicular to the ground position. If the body is properly connected, the arm should push out proportionately. This means that the arm should only push out far enough for the forearm and upper arm to form a 90 degree angle. If the body is not connected enough, the arm will not open proportionately and the angle will be bigger or smaller than 90 degrees.
It is during this third step that the rear heel should be pushed out and adjusted if necessary. Once again, separation and proportionality are produced by ensuring the torso does not toss as the waist/dantian rotates to push out the heel and hand. At this point, the rear leg will change from its moderately relaxed state to become fully connected and engaged. As the rear leg pushes into the ground, a lign to the hand is created which shifts most of the energy off the front/right leg and onto the rear/left one.
Out with hand
At this stage, both kua joints should be stretched open with the knees pushed out, the arm should be bent at a 90 degree angle, the palm should perpendicular to the ground and waist rotated fully to the right. The fourth and final step requires the body to return to its initial structure with the waist at its neutral position. This requires the waist to turn 45 degrees left from its full right sided position. This final rotation to the left pushes the arm out further and turns the palm over to its original 45 degree downward pointing position and sinks the body even more. Therefore, the final step of the circle is a rotation in which the shoulder and torso are turning in opposite directions, working like gears. This ensures that the shoulder and torso rotation is where the energy and power is being produced, not in the arm or hand. The final rotation ensures that the leading shoulder does not protrude back, but is pushed forward to allow the energy to travel through the torso into the arm and out of the hand. Once the body has reached its neutral centered starting position, the body may be raised to compensate for the sinking which occurred in the three final steps.
Once a student reaches a proficient enough level, each move should be dissected and understood in terms of how each arm is powered up and where the energy comes from. When this is done, one quickly realizes that most moves in the forms require each arm to perform opposing circles and functions at the same time. However, because each rotation of the waist always pushes the knees out further, the legs are able to continuously support and power up each arm even though they might be performing different functions.
{ 11 comments… read them below or add one }
Hi Matt, thank you for another very helpful article. Understanding that ultimately it is this circle we want to master and spread that mastery to include all of the movements in Practical Method, I wondered if you might help me with some questions that perhaps could help me clarify some sticking points I have?? As I try to comprehend all that’s going on i find myself returning to the same questions. To start i just want to know is the line we are working with in the upper torso the same line that is between our feet? If we are practicing a right positive circle the left toe through the right heel line as we orient ourselves? This line basically divides our body into two halves and our axis from bai hui through hui yin (as if a plum line were dropped from the ceiling) should be directly over that line rotating on it without moving back and forth or deviating in any way (ideally)? So on the way back (elbow in) it’s on one side of that line then when we rotate it’s switches to the other side…sorry this may seem overly obvious…but what i’m wondering is when it switches back…it sounds as if it’s still inside that line in step three? and if it’s already crossed over this would be the elbow protruding…correct?
sorry i said that backwards left heel.. right toe in a right positive circle??
Hey Bruce,
I would have to say that the line between your feet (which runs from the rear toes to the front heel) and the line from the bai hui to the hui yin are different lines that meet at a certain point between the legs to form a 90 degree angle, like an upside down ‘T’. The most important thing to remember is that the vertical line of the spine cannot bend forward or backward at anytime as the 90 degree angle should never be broken. This would be considered serious tossing. If the spine remained at a 90 degree angle while rotating but shifted backward or forward slightly, it would still be a form of tossing but in my opinion, much less serious.
You see, the more you can keep these lines in their original positions while rotating, the tighter the spiraling in the entire body becomes. Master Chen always says “don’t move!” and what he means by this is, “don’t shift sideways or change the angle of the spine”. The torso must rotate and the arms must be pushed out or pulled in without deviating this vertical angle or tossing the core of the body from side to side.
As for the line that divides the two halves of the body (left and right) it is important to remember that this is the same vertical line and the hands must never cross it. The rule in the Practical Method system states that the hand must never cross the center line of the chest. However, when the waist rotates to the left for example, so does the center of the chest. So, the hand can follow. The other line the hand cannot cross is the outside of the leading thigh. If at any time the hand crosses either of these lines (the center of the chest or the outside of the thigh) the structure of the body becomes weak and vulnerable.
I hope these explanations have helped answer most of your questions. I really enjoy the challenge of finding new and better ways of simplifying difficult ideas. Thanks for your comments.
Mat, an excellent piece of literature sequentially operationalizing a crucial and necessary foundation of Practical Method. It seems as though you observed some of my personal struggles in the circle…in the last sequence of pushing out the hand, my leading shoulder protruded back, as you described. I found doing circles with my back against the wall helpful in resolving this dilemma.
sorry for asking that question in such a confusing way..that probly made your head hurt…maybe a better way of asking it is where is the “track”…Master Chen says we are “laying a track” which it seems must be the most efficient line of power for that particular orientation of the body. ? if we think of it as a line projected by the left heel…right toe (in right positive circle) and we extended that line straight upward into a plane it would divide us in half along that plane and our elbow would be on one side of that plane and then the other…if that is not the track how should i view it?
I believe that “laying of the train tracks” is a simplified example of the “Ji” principle. Ji which means to form or to shape. Usually, your hands are not allowed to move on their own but the only exception is when you want to make contact with your opponent. Making contact with your opponents is part of laying of the tracks. But once you are in contact with your opponent, your hands don’t move. Like the tracks that have already laid should not be altered on a working train line.
Now it is important the way you lay your tracks or position yourself. It is important not to position yourself in a disadvantageous position. Or laying tracks under a river or over a cliff without the bridge. It is not bad to position yourself in a slightly disadvantageous position as long as you know how to get out of it. Or laying tracks over the cliff if you know how to make a bridge. But it would be best if you can position yourself on a advantageous position. Or laying the tracks on firm ground while your opponent is on the cliff. Although most of the cases, when your opponent is on the cliff, so are you. Train on the bridge, you and your opponent are on the bridge.
Although at first you are allowed to move your hand. Once in contact, you have to stop letting it move by itself. Like you are allowed to decide which direction the first track goes, the rest of the tract must be in line with the first track. Even in curved tracks, they must be in line with the track and not all of the sudden gets cut off and not build a parallel or perpendicular track. Meaning once you are in contact with the opponent, you will need rotate other parts of your body in order to expand your contact with your enemy. You are allowed to push the enemy off the track or push the opponent perpendicular to the track; but the track line itself cannot be perpendicular.
The Ji principle is not limited to the hands but to any part of the body that makes contact with the opponent. Also, although most of the times you “squeeze” yourself “into” your opponent to make contact with him/her. There are times that you have to “expand” and “collapse” “onto” and “away” from your opponent. But because the most simple and common way to make contact with your opponent is with your hands and to squeeze your body to warp your hands into your opponents body; the classical texts used the word “Ji” which directly means “squeeze”.
One example of “collapsing away” from the opponent is what Master Chen refers to making a temporary platform for the enemy to stand outside the cliff-space. Meaning that your opponent is standing on top of your structure and once you remove your structure, the opponent falls down. It is like you made the bridge and your opponent is on it. You destroy your bridge and the opponent falls down with it. Everything i mentioned here is explained on Master Chen’s Zhuan Guan video. You might want to take a look at it if you want to learn more.
Thanks alot cshum00!! Your description helps to understand many things! I’ve noticed when i’m in the fully compressed position after “turn with waist” there is a nice little very round empty space for someone to fit into comfortably feeling like everything is fine but then as I extend it’s like a giant pair of scissors cuts them in half using the upper and lower seperation…squeezing and cutting them out of where the empty space was. The hard part is not to try to create the action with the arm but just use it to adjust while the waist does the work. I’ve noticed at the very end of the movement (in application) Master Chen will often push off his toe..lifting the heel up which drives his thigh upward and at the same time driving downward with the upper half….this last little action seems to add so much to overall effect! …..enjoyed watching the Live Feed From Singapore with you and everyone else last night…that was very cool
Mat, should the elbow go all the way in or should the arm “spin” on the axis cause a full turn and the hands to meet the torso, like in master Chen’s basic faundation videos.
Thanks
Hey Aiki,
The elbow should always come in all the way and tuck into the ribs. This has been reinforced many times by Master Chen during his full time lessons and his many instructional videos. Grand master Hong also states that the elbow should always stick to the ribs. As for the hand meeting the torso, I would have to disagree. I believe that if the “hand” came into touch the torso and not the elbow, the arm would be in a very disadvantageous position and this would collapse the arm and cause a loss of energy and strength.
Hope this answers your questions…
Hi Seniors here
Perhaps one way of looking at the taiji practitioners ‘circle’ occurs do to his linear movement being pulled into a spiral with the dantian as ‘gravitational’ centre.
Thus, circular movement occurs not because the practitioner consciously moves in a circle; rather it is the result of a linear movement seeking to find equilibrum against an opposing force.
Just some thoughts after a very fruitful Singapore seminar with Chen laoshi!
Thanks Mat for this great article and it is very helpful for us beginners. Just my junior point of view in the hope that someone may correct me. I see dantian area as an energy center. You lock front shoulder and kua as hinge and then elbow in and turn the waist and twist the front thigh, opponent’s energy is pulled and turned into dantian to store the energy as elastic energy. Then out of hand by pushing him back by turning rear thigh, open the back and return the energy back to the opponent from dantian. Front hand and rear foot push in opposite directions along a straight line which direct this energy from your spiral action through dantian back to the opponent. Dantian is like a big spring. Opponent will be then bounced up.
Xiao, we can “see” you guys had a good seminar with Master Chen!