 |
Master Chen emphasizes the importance of adhering to rules in traditional training. He begins: “The entire Practical Method system is founded on positive and negative circles, allowing no [other] movements. Every action of the body must conform to either a positive or negative circular motion, similar to the mechanics of a car or gearbox. In a gearbox, movement occurs solely in clockwise or counterclockwise directions—either synchronized or unsynchronized—but the gears cannot separate or function independently. Likewise, within this system, there is no personal freedom; every motion must follow a prescribed pattern. “ |
| (This is Part One of an edited transcript of the Basic Principles of the Positive Circle in the 2013 Workshop in Sacramento sponsored by Carmen Farrugia.) |
|
|
Part 1. Every motion must follow a prescribed pattern
Part 2. Relaxation does not exist
|
Part 1. Every motion must follow a prescribed pattern
1. Establish a reference line
 |
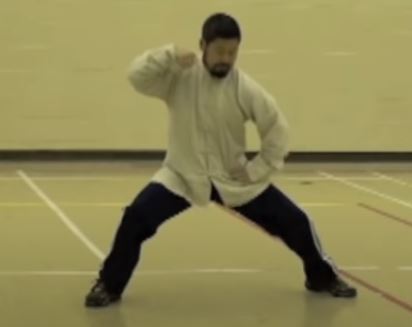
Master Chen describes the process of establishing the basic stance in Taiji. The student must first visualize a straight line on the floor aligned with the coronal (frontal) plane of the human body. He states, “There is a [reference] line here [on the floor].” Figure 01 depicts the start of the class, with Master Chen and the students standing in their ready stance. |
2. Foot Position
In Figure 2, Master Chen illustrates how he enters a stance used for drawing a circle in the Practical Method. He begins in a parallel stance with his feet shoulder-width apart. The sequence unfolds from the left side and includes the following steps:
 the reference line. |
A – He steps forward, placing his left toe against one side of an imagined reference line (depicted as a green line in the image). B – He shifts all his weight onto the left foot. C – He draws his right foot inward toward his body. D – He steps outward, initiating the movement with his right ankle. E – The right ankle lands on the opposite side of the reference line (again shown as a green line). |
Master Chen elaborates on foot placement with the following explanation: “Your left [rear] foot is here [with the instep just touching one end of the line]. Your right [front] foot is here [with the middle of the foot just touching the other end of the line]. This [instep of the left rear foot] is [positioned] 90 degrees [perpendicular to the line], and this [middle of the right front foot] is [positioned] 45 degrees [to the reference line].” Figure 03 visually outlines the positioning of the feet in relation to a designated reference line.
3. Stance Width – 3 sections of equal length
 |
Master Chen elaborates on the spacing between the feet: “This indicates the width of your stance [from the left instep to the right middle foot]. This marks [the position of] your rear kua [projected onto the reference line]. This marks [the position of] your front kua [projected onto the reference line]. As illustrated [on the diagram], this [distance between the rear foot and the rear kua] represents one third [of the total stance width]. This [distance between the rear kua and the front kua] constitutes one third [of the total stance width]. This [distance between the front kua and the front foot] accounts for one third [of the total stance width].” The division of the stance into three segments—from rear foot to front foot—is illustrated in Figure 03 .
“In Chen Style Taiji, this is known as the one-third, one-third, one-third rule. This principle eventually integrates with the Taiji concept of the three joints. In Taiji, there is an essential idea of working with the three joints, making horizontal alignment and body proportion highly significant.” |
4. ‘Not-On Not-Off’ (‘不啟不閉’)
Master Chen explains the relationship between foot positioning and the reference line: “When the [toe of your rear] foot touches [one side] of the reference line here, and the [heel of the front foot touches the other side of the reference line] there, this [positioning of the feet] is referred to as ‘Not-On Not-Off’—a concept in Tai Chi. In Chinese, it is known as ‘不啟不閉’ (Bu qi bu bi).” This indicates that the feet are not aligned heel-to-heel or toe-to-toe, as seen in other martial arts stances. Figure 3 illustrates this concept, showing the rear toe placed on one side of the reference line and the front heel on the opposite side.
He further elaborates, emphasizing the importance of a strong foundation: “I’m taking extra time to ensure the fundamentals [of the stance] are solid. Then we can start moving. Because this [foundation set-up] is absolutely crucial. If you don’t have this right…” To highlight its significance, he uses an analogy: “It’s like building a house without a foundation. You begin constructing, only to realize later that you have to redo everything because there was no proper base—everything collapses.”
|
Master Chen demonstrates the vertical one-third rule by referencing his ankle. “[Consider the distance from] this knuckle here…” As shown in Figure 4 , he points to the medial malleolus of the tibia at his ankle. “…to the base, the back of your knee [the head of the fibula]. [If you use] a stick to measure this [distance], [this measured length corresponds to one of the key dimensions highlighted on the reference line, such as the distance from the rear foot to the rear kua].”
“For me, the width of the stance is roughly here,” he said, indicating his position. Then, gesturing toward one of his taller students, he continued, “For you, and for most people who are tall, the size of your stance needs to be very wide.” |
 |
 |
Master Chen illustrates the importance of stance width using the concept of a water container. Your stance acts as a container for your body’s energy, and just like a small vessel struggling to hold excess liquid, a narrow stance cannot manage the surplus energy generated by the upper body. He explains, “Just as you cannot use a one-liter container to hold four liters of water without spilling the excess, your stance must be appropriately sized to contain and control your movements. It’s a matter of physics — you simply cannot fit more water into a full container.”
“This [stance] is the container for your body. Once this happens [you stand in a correct stance], it’s extremely difficult [at the beginning] because it’s going to hurt. |
All of these [pain and range limitations] are superficial. When the container is right [size], the water and the container relationship eventually will work out. Otherwise, [when your stance is too narrow even if] you feel good [initially]. [The body, the thing that you want to contain, ] your water has nowhere to go [because the container is already too full]. It [the things you want to contain] spills every time [when there is an excess].”
Master Chen then demonstrated the advantage of the correct stance width through some upper body movements. “Once you are in the correct stance,” he explained, “you can take any action on your upper body without losing your center.”
5. The Height of the Stance
“The knee must remain stationary. Let us not discuss where [the knee should be.] Look—this is your kua.” Master Chen points to his kua (胯), traditionally understood as the groin area—the anatomical region where the legs attach to the torso, involving the hip joints and inner thigh muscles.
He continues with emphasis: “The kua must not be lower than the knee. Keep it as low as possible, but never below the knee—if it goes lower, it’s too low.” This key principle is visually illustrated in the first two panels of Figure 6: the red line marks an incorrect, overly lowered kua position, while the green line shows the proper alignment, demonstrating where the kua should remain in relation to the knee.
Master Chen moves through the room, attentively observing and offering guidance to his students. “You should go flat,” he instructs, referring to the correct alignment—where the thigh (femur) remains perpendicular to the knee. Urging them deeper into the practice, he adds, “Go all the way. Experience the movement—sink down and feel it. If you get tired, rise immediately.”
| He offers a crucial reminder: “You can’t sink down if the container is too small. When it’s too small, your knee ends up in the wrong place.” This concept is visually reinforced in the last two panels of Figure 6. The red line illustrates an incorrect stance—overly wide and structurally imbalanced—while the green line depicts the proper stance width, demonstrating how correct positioning supports effective movement and alignment. |
 |
Master Chen elaborates on the critical positioning of the calf [or the tibia]: “The calf must remain straight. Think of it [like] a nail—it can never be hammered in sideways. But more precisely, it’s not a nail but a spike used to secure a tent. When setting up a tent at four corners, you drive a spike into the ground to anchor it. That spike must be perfectly straight [perpendicular to the ground]. Avoid any sideways placement—going sideways will cause it to be pulled out. You may need to adjust slightly backward [to counter the pull of gravity] to strengthen the anchor, but never in the wrong direction [away from the perpendicular].”
Master Chen offers guidance as students practice their stance: “If it’s too difficult, go down [to the right height] and rise [right away.] [The important idea is] to experience the position [at the right place]. Feel the challenge [of reaching that stance]. Right now, since you can’t lower yourself fully, you compensate [by bending forward.] [At this stage of training,] you [can] adjust slightly [in form] to develop that awareness [of the correct stance height]. Over time, you’ll be able to sink lower [to that height.]”
Master Chen emphasizes the significance of achieving the correct stance height, explaining that once it is reached, “…everything is free. Only when everything is free will your body begin to be suspended. If you’re not free, the center cannot be suspended, because the inside is too tight. ”